
Atmo
Atmo is an Interactive Environment created within the minor Interactive Environments of the TU Delft. During this minor we designed an environment that aims to provide patients aged 2-10 years old and their families with a place to feel more socially and emotionally comfortable. The environment was designed for and in cooperation with the (future) Princess Maxima Centre.
Students: Ellis Bots, Noëlle Lugtenburg, Joëll Magré, Rosa Storm, Eva Zillen, Michael Probyn, Karst Brummelhuis, Nigel Smink, Marcel Gleeson.
Coaches: Sara Ferrari, Aadjan van der Helm, Tomasz Jaskiewicz, Marco Rozendaal.
To explain more about this project, we selected about 20 photos to illustrate the process and other important aspects. We will tell you something about the design of our installation. We have several different subjects that we will describe.
Floor
We made a separate floor for our installation. Here we will tell you all about it.
Why was it made?
In order to make the vibration sensors in the floor work we needed a floor that would vibrate. The concrete floor at industrial design would not work with our vibration sensors. A wooden floor would do the job. Besides, we could also fit the speakers partly in the floor, and we could hide all the essential wiring and technology underneath it.
How was it made?
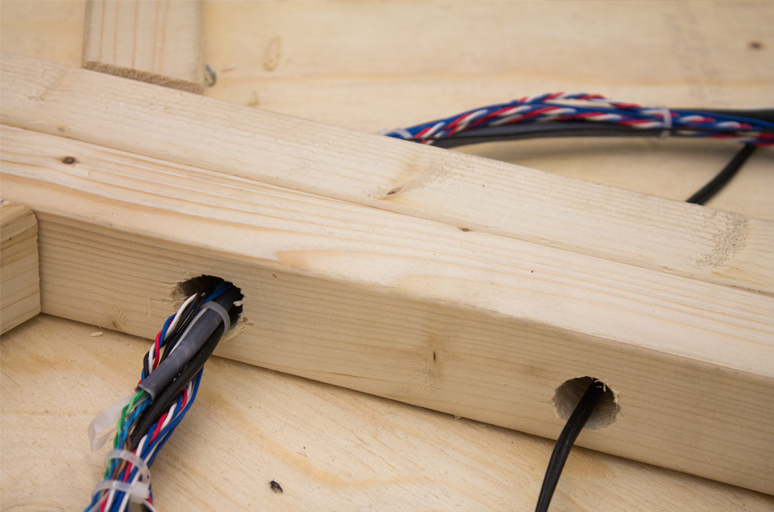
We were lucky enough to get the upper part of the floor sponsored. It was already milled for us so it fit perfectly together. The frame beneath the floor was made out of beams to give the floor structural support. We made the floor out of eight pieces so it was easy to transport it to industrial design.
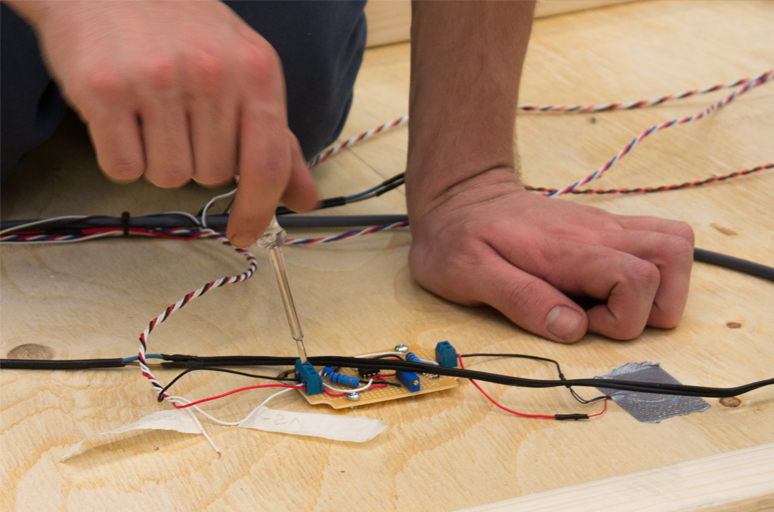
Floor Sensors & Code

8 Piezoelectric vibration sensors make up the footstep-sensitive-floor. The circuit for the amplification of the sensors does not raise the signal to a range where it is fully visible to the Arduino. The Mega’s analog input will detect voltage values from 0 to 5v. The amplified piezo signal is from -5v to 5v, giving us just the positive cycle of the wave. Each signal is read by its own analog input on an Arduino Mega. To determine whether or not to trigger a footstep sound 5 data samples are taken from the sensor, if one of the samples is less than the last (a turning point) the value will be tested against a threshold (is it loud enough to be a footstep). If the value is loud enough it will send out a serial message to Max Msp with the id of the sensor triggered and its loudness value. This will happen for each sensor thousands of times per second.
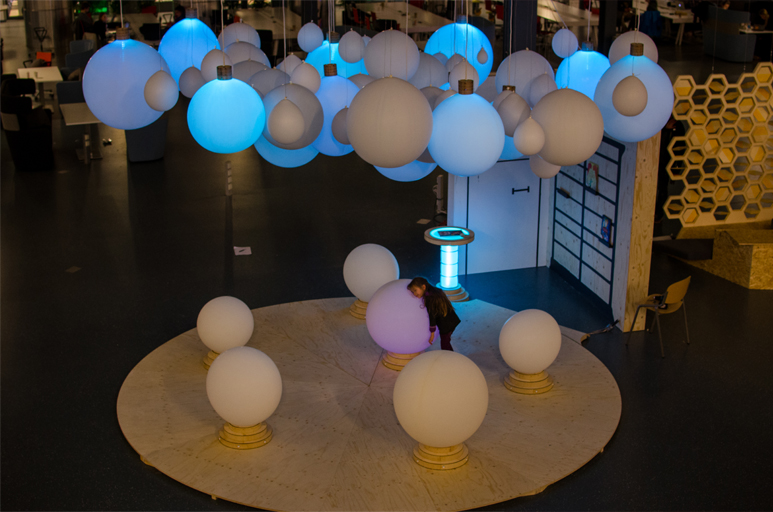
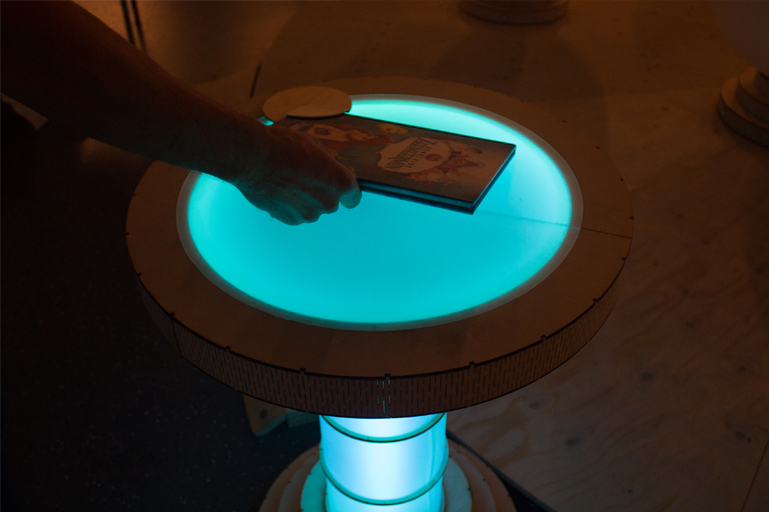
Scanning Table
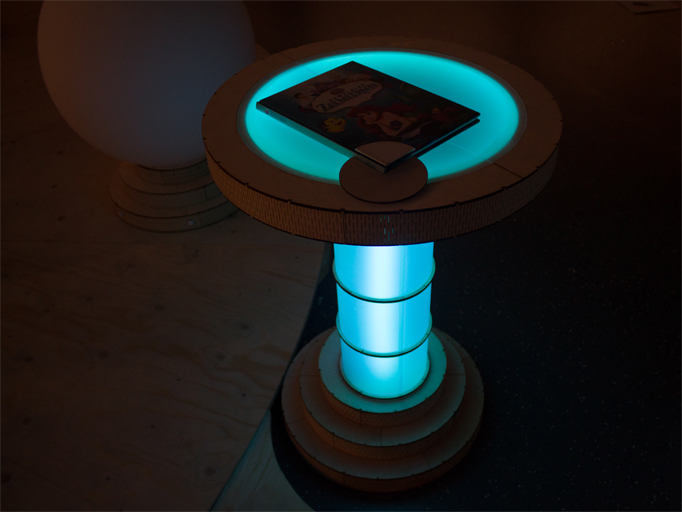
To start up the entire environment, the single most important thing you need is a book. We created a Scanning Table to scan the book you read. Once the book is scanned, the whole environment starts up and you can enjoy the story.
Placement
The scanning table stands beside the drip rope. This is where the kids wil most likely enter the environment, so this is also where they should start the interaction. Also, like this the table does not stand in the way of playing children, which would be the case if the table would stand inside the environment.
Looks
Though the scanning table stands a bit apart from the installation, we had to make sure it remains a part of the installation. Therefore, no new elements are used in the scanning table. The bottom of the table has the same composition as the stands of the ground objects, but that’s not all. In these stands you can see a rhythm of the rings on top of each other with a constant distance between them. This rhythm returns in the rings which hold the shining table-leg together. Furthermore, the rings in the stands get smaller to the top with a standard enlargement. The table top and the shining circle on top of it, fits with these standard enlargements. The only ‘new’ element in the scanning table is the incomplete circle. This is a conscious choice. Namely the book has the missing part of the circle. This triggers the user to place the book in the right way on the table.
Interaction
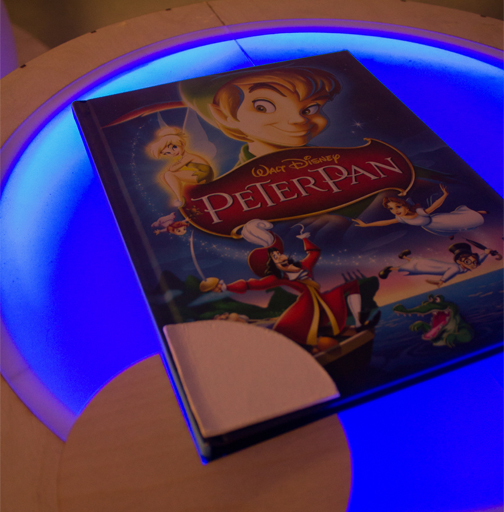
The scanning table is where the interaction between the user and the installation starts. Therefore, it is important that it invites you to interact with it when the installation isn’t activated yet. That’s why the table lights up and blinks when there is no book present; it asks for your attention. After you placed a book on the table, the light changes to one certain color; the color of the environment. At this point, the table stops blinking. It’s satisfied. Now, the lights on the ceiling starts to blink and the attention goes to the rest of the installation.
Technique
The most important technique used in the scanning table is an RFID-scanner. This scanner scans a card which is inside the cover of the book. Due to this, a certain state is activated in the environment.
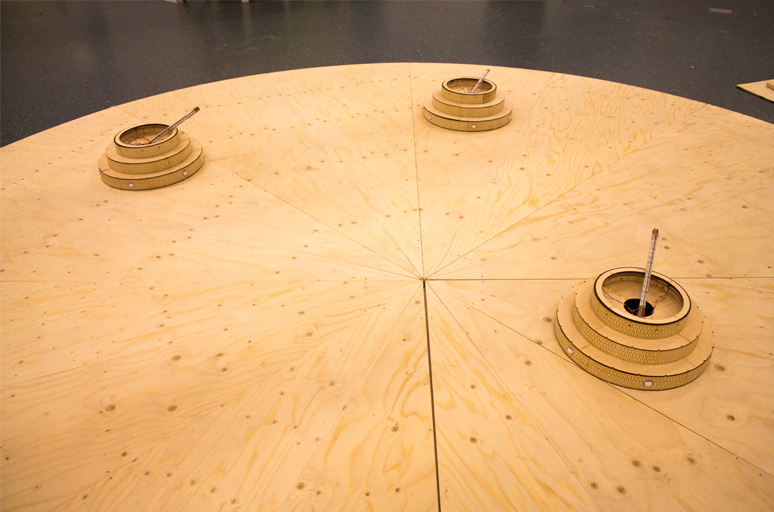
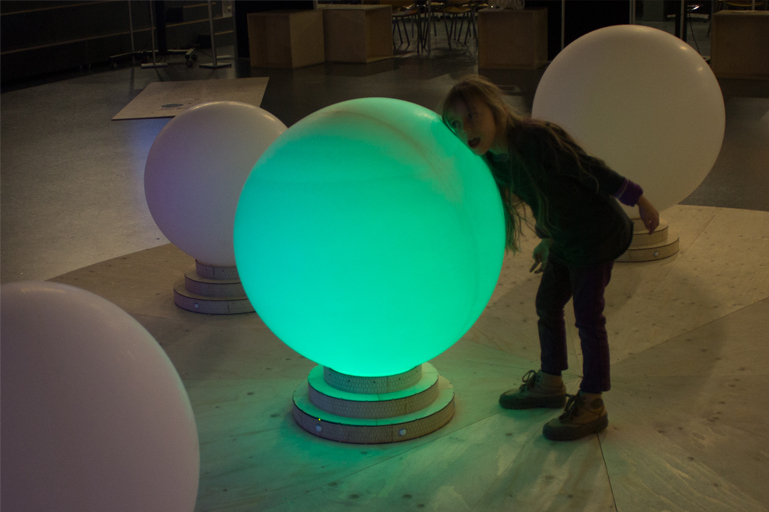
Ground objects
To make our installation more interesting, we created objects on the floor. In these objects characters were „hidden”. By walking past them you could hear a sound and some light would flicker on and off. The ground objects consist of several parts themselves, which we will discuss separately.
Stands
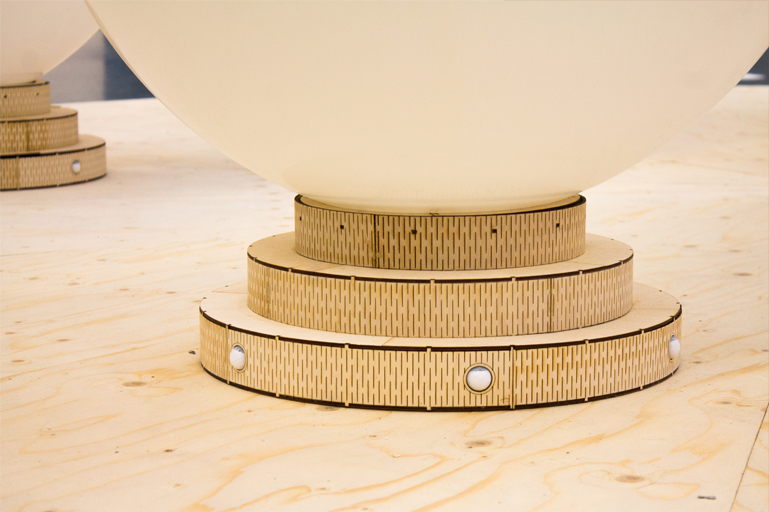
To ensure the objects were held in place, several stands had to be manufactured. These stands consist of several interlocking laser-cut parts. In order to maintain the magical effect, the stands were designed using a fortune tellers globe as reference. The triplex was laser-cut in such a way that the vertical layers were able to bend round the object, as well as giving the object a nice aesthetic view. A hole had to be made in the top horizontal plate to allow the electronics to be placed inside the object, as well as keeping this object in place.
Sensors & Code
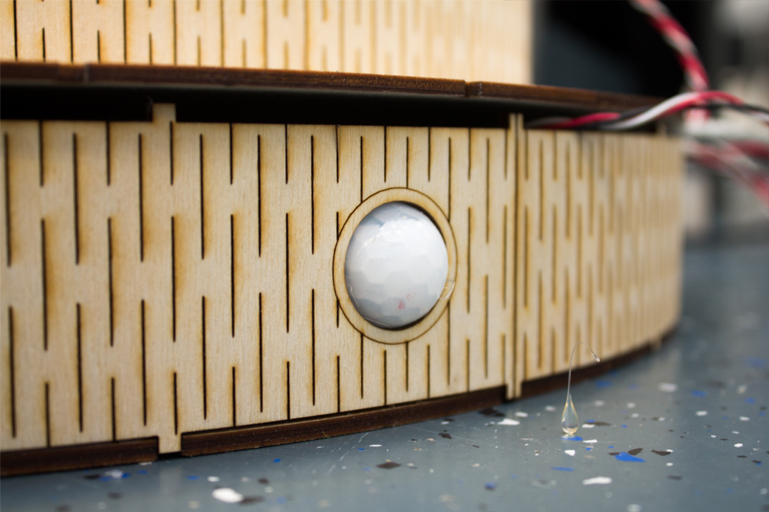
When we started to conceive a setup for the distance detection for the ground objects we came across a number of issues. Conventional UltraSonic or even infrared distance sensors only look at one specific point, and considering we needed distance detection around all sides of all six ground objects we needed a much higher field of view from the sensors. We came up with a creative solution, which was using six motion sensors for each ground object, with two different configurations. Because motion sensors do not measure the distance, we blocked off parts of the lids that covered the sensors, blocking off parts of the field of view we didn’t want to measure for that particular distance. This lead to a seamless experience while being a cheap solution.
Drivers
In order to make the ground object work we had to hook up six sensors, a LEDstrip and three buttons. We designed a board where we partly used the previously designed LEDstrip driver and added six sensors and the buttons. At first, we wanted to make this all work with an ATtiny but we could not get this to work in time so we used an Arduino instead.
Balloons
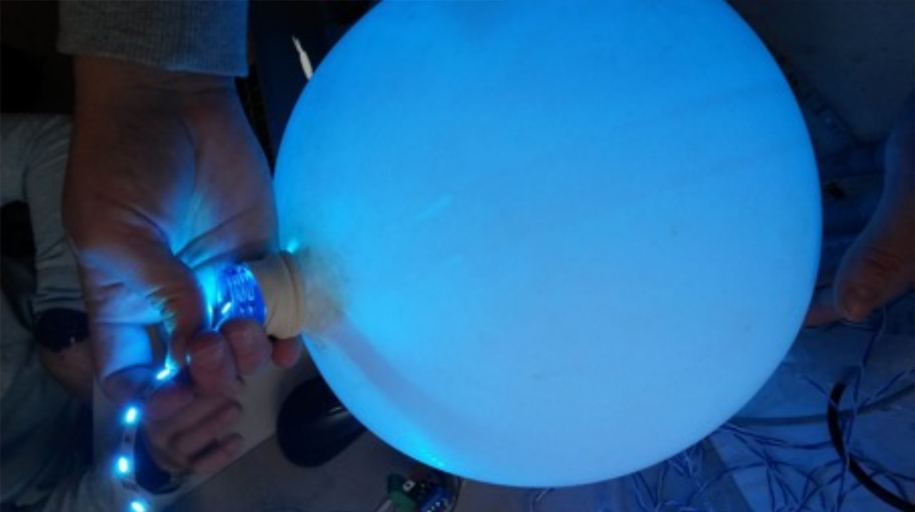
After quite some time finding the perfect way to create semi-transparent spheres, we chose to go for balloons. When we made this decision however, we encountered some problems. We wanted to use LEDstrips to produce LEDlight inside the balloons, but balloons have the annoying property of deflating when not properly fastened. We did quite some tests to find out what the best way was to do this. In the end we chose to put a bottle in the balloon and tighten the balloon around the neck of the bottle. In this way we could put the LEDstrip in the balloon without air escaping.
To complete this picture, we wanted a way for the LEDstrips to not just ‘ float’ in the bottles. In the tests it happened quite often that a LEDstrip broke down or just a wire disconnected. We attached them on a wooden stick and soldered the wires exactly on the right size. This stick fits perfectly in the bottle.
Speakers
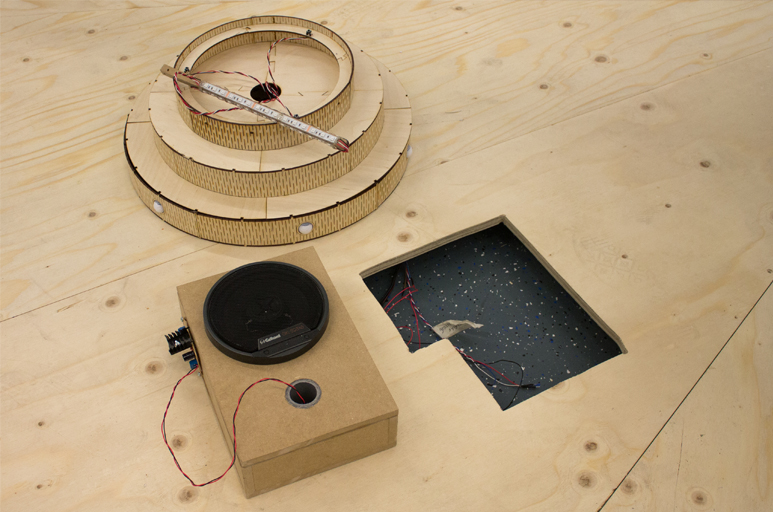
The sound for the installation is provided by 7 separate speakers. One per object and one for the environmental sound. The object speakers are place inside the floor beneath the object to give the feeling that the object itself makes a sound. The environmental speaker is placed above the balloons on the ceiling. By placing it there, the whole environment will be equally filled with the same sound.
To low frequency sound can only be heard when the speakers are enclosed by a box. These boxes have the dimension of 30x20x10 centimeters. There is also a bass reflex fitted in to the box for making the bass more direct. The upper speaker is fitted in a box with dimension 30x20x20 centimetres. This one actually sounds the best. The others could not be bigger because they had to fit inside the objects.
Hanging Lamps
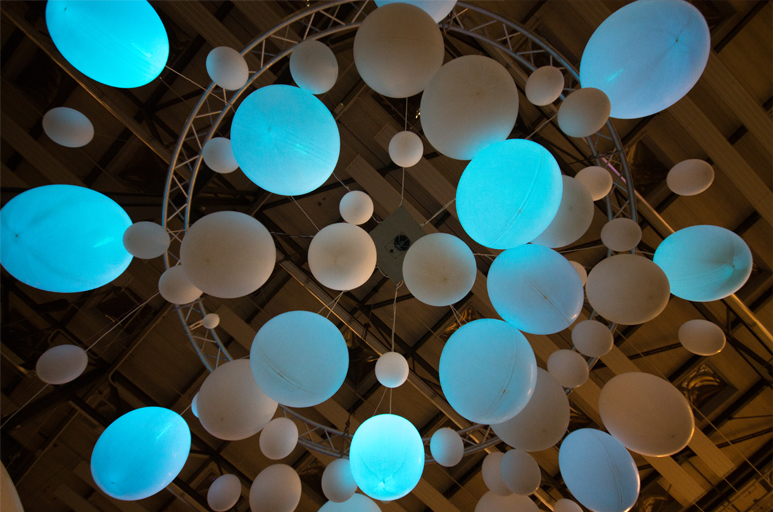
To create the overall nice atmosphere of the environment, we wanted to make a ceiling that provides light and sound according to the environment. We decided to do this by making one big cloud of hanging lamps. It is supposed to be one surface so that you don’t see the actual ceiling or the frame anymore.
Balloons
The balloons in the ceiling were designed and used in the same way as the balloons in the ground objects. The main difference is the size of the sticks, bottles and balloons itself. We added several differently sized balloons to create a more magical and fun experience.
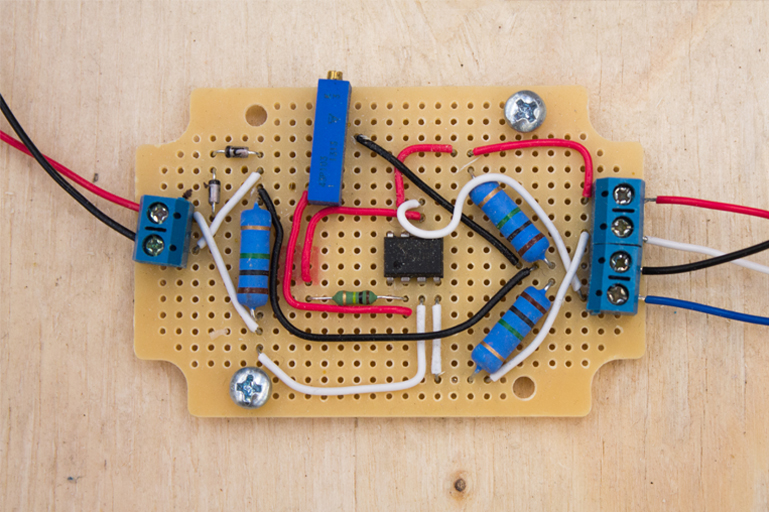
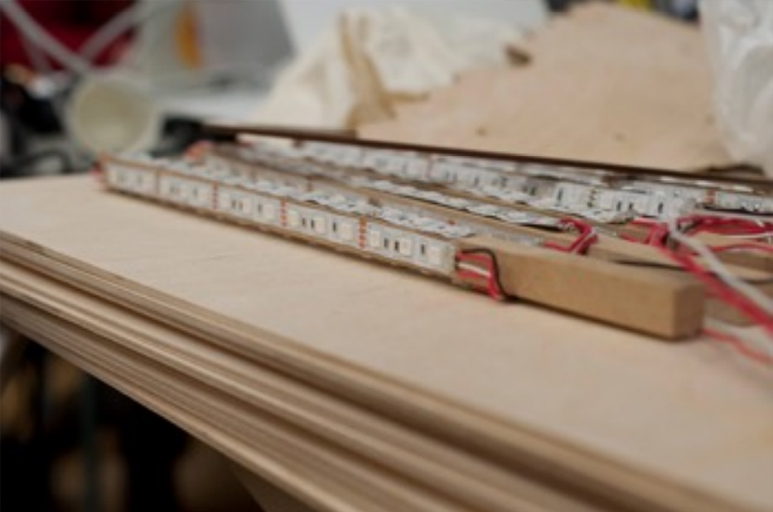
LEDstripdrivers
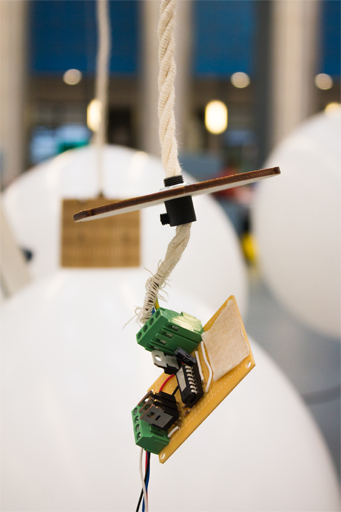
Because the Arduino has a lack of pins to control the led strip we searched for another solution. We used ATtinys instead. With transistors, a voltage regulator and the ATtiny we created a LEDstrip driver. A single signal wired could now be used to control the LED strip. This worked out really well.
Caps
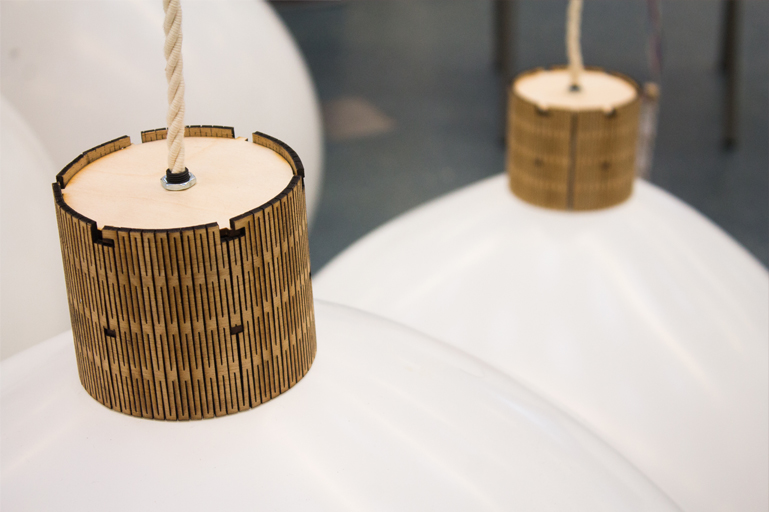
To hide the LEDstripdriver and give the hanging balloons a nicer aesthetic overall, we designed a cap. This cap is lasercut in the same pattern as the stands for the floor objects. It took a long time to lasercut the caps! Because the wood had to be bended pretty far, a lot of vertical ‘stripes’ were needed. Only one small cap takes about 30 minutes to lasercut. Since we had 15 hanging balloons inserted with LEDlight, we also needed 15 caps. The small caps alone took about 7,5 hours of lasercutting!
Wire
We used wire sponsored by Snoerboer to provide the hanging lamps with power. We chose a simple yet interesting kind of wire to make sure that the wire looked appropriate in the installation. The shape and material of the wire gave the installation an even more interesting look, and many people asked us where we got it.
Interactions
The installation consists of a couple interactions that are designed to be understood intuitively by the user. The scanning table, to begin with, slowly pulses light when there is no book active, in contrary to the rest of the installation. This will attract children and lead them to the scanning table, where they ‘activate’ the book by putting the book on the table.
This is the moment when the story comes alive and children ‘enter’ the story. Background music starts playing, the hanging spheres will light up in the colour from the story environment and your footsteps will make sounds like you’re walking in the world of your story.
Children can interact with characters from the story that are hidden in the spheres on the ground in two ways. Based on analysis of children’s books, we created three different categories of characters: a ‘good’ character, a ‘bad’ character and a character that is travelling through the objects. When you come close to any of the spheres, it will light up in the colour of the character and occasionally make a sound depending on which sensor is triggered. Every character has its own package of sounds, so you will not here the same sound every time you trigger the same character. When pushing the ‘moving’ character, it will move away to another sphere as if it’s teasing you to catch them. Both the ‘good’ and ‘bad’ character will not move around during the interactions. Instead, they create a bigger effect once in a while by influencing the lights of the hanging lamps and the sound coming from above.
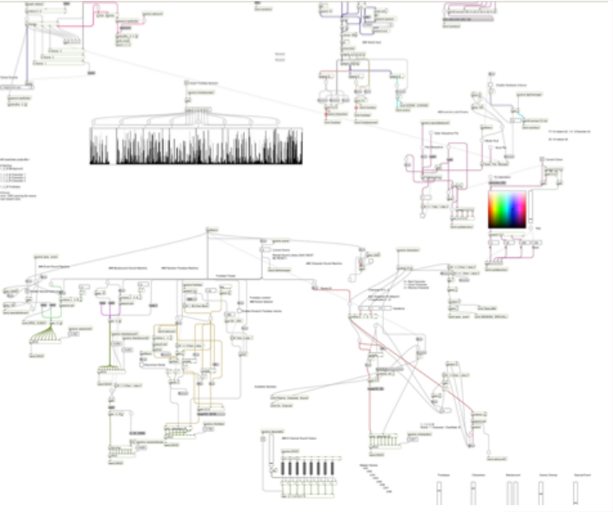
The interactions are designed in such a way that they would fit any book. The interactions of each book are shown in an interaction overview, with the user’s ‘actions’ and corresponding light and/or sound responses for each part of the installation in there: footstep sounds, floor spheres, hanging spheres and background music. This includes RGB codes, sound folder locations and brightness diagrams. The embedded system designers have used this information for programming the interactions.
Design Team
Eva Zillen – Project Manager
Rosa Storm – Public Relations
Noëlle Lugtenburg – Interaction
Designer Ellis Bots – Formgiver
Joëll Magré – Mechanical & Structure Designer
Karst Brummelhuis – Manufacturer
Michael Probyn – Material Hunter
Marcel Gleeson – Embedded Systems Designer
Nigel Smink – Embedded Systems Designer
Instructors
Aadjan van der Helm
Sara Ferrari
Tomasz Jaskiewicz
Sponsors
Prinses Maxima Centre
TU Delft
ID Studiolab
Snoerboer – Nice Looking Wire for our installation
iPrototype – Electronics
Bubble XL – Large balloons
mooieslingersenballonnen.nl – Large balloons
houtlijn.nl – Wood for the floor
HobbyElectronica – Motion Sensors
LEDworld – 10m LEDstrips
Kromhout Electronixs – Power Supplies