Vox

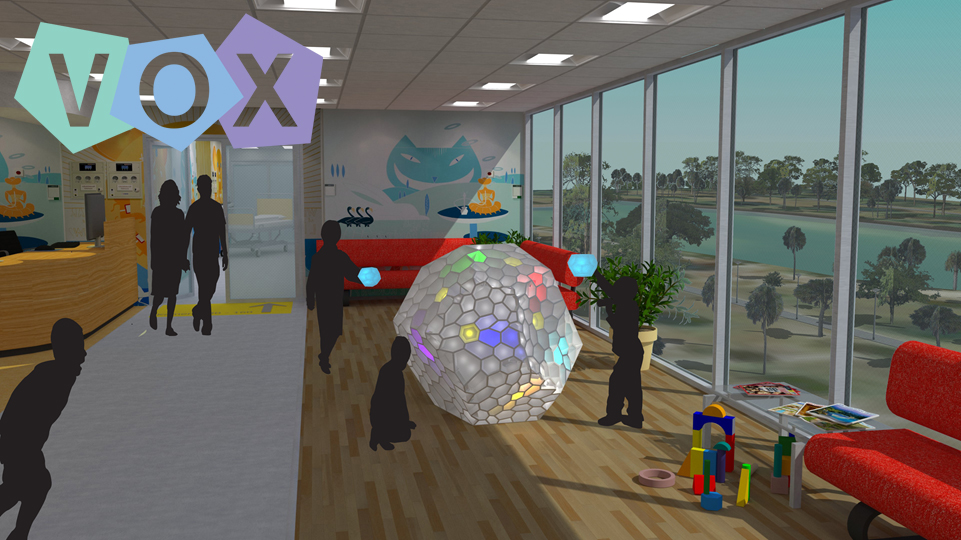
VOX is one of the three designs of this years Minor. It consists of an interaction point called the Vox and a personal device called a VoxBox.
Mission: “VOX is an interactive environment that will help children to get their mind of their disease”
Vision: “VOX wants to stimulate physical and social development for children by means of an installation with a mobile device which is personal and stimulates social interaction in the hospital”
VOX concentrates on children within the age of 6 to 12 years old. This is a essential phase in the development of social skills. VOX hopes to aid in overcoming the disadvantages of living in the hospital and facilitate social interaction.

In the hospital, every child between 6 and 12 years old gets a VoxBox from the nurse while checking in. The nurse gives a basic explanation of what the VoxBox can do. In this case Tommie, a boy of 10 years old, checks in at the hospital. When leaving the hospital, Tommie returns the VoxBox back to the nurse. So the VoxBox feels as a personal gift to Tommie, he will take good care of his VoxBox.

In the picture above is shown how the VoxBox is controlled by Tommie. Every VoxBox is unique; it has its own unique light color at the bottom that is always on. The color of the lights behind the four recording slots depend on the VoxBox the sound was originally recorded on. For example, in the picture above, one recording slot lights up in blue. That means that this sound was recorded by the VoxBox with the permanent blue color shining through the bottom. Tommie has a green color on the bottom, so every sound he records by himself becomes green. This way, Tommie can link the sound to the person with the VoxBox that recorded the blue sound. In this way the barrier to start talking to other children is lowered.

Here, Tommie records his own sounds. These sounds can be anything: jokes, riddles, funny environmental sounds, a message or an appointment. If Tommie doesn’t feel well, he can record sounds in his room or bed. When he feels a bit better, Tommie can record sounds anywhere in the hospital. In the photo Tommie plays his own sounds back to check his sounds. He puts his ear to the VoxBox and listens to his own recorded riddle: “Why did the chicken cross the road?”.

When Tommie is satisfied with the four recorded sounds on his VoxBox, he can go to the Vox. He has four own recorded sounds, so all the recording slots are green. At the Vox he can dock his VoxBox in a docking station. At this moment his four sounds with lights behind the recording slots leave his VoxBox and enter the Vox. These four sounds are represented on Vox with their specific color of light ‘walking’ a path over the Vox. The paths that the lights will follow is randomly generated by the Vox. Also four other lights with corresponding sounds from other children that were already in the Vox are drawn to the VoxBox of Tommie and enter it. Tommie can now take his VoxBox out of the docking station and listen to the new four sounds in his VoxBox. He can see by the color of light from the recording slots wich children recorded them.

Ellen, a little girl of 7 years old, docks in her VoxBox into the Vox. In the photo you can see that one of Tommies sounds walks towards the VoxBox of Ellen. When the four new sounds are in Ellen’s VoxBox, she takes her VoxBox out of the Vox.

Ellen listens to the new sounds she recieved. One of the sounds is the riddle from Tommie: “Why did the chicken cross the road?”. Ellen is curious about the riddle, she wants to know the answer. She can see by the color of her recording slot that someone with a green VoxBox has recorded the riddle. Ellen starts searching for the green VoxBox and its owner.

Ellen found Tommie, the owner of the green VoxBox. She starts a conversation and asks about the riddle. Tommie: “Because the chicken wanted to go to the other side, Ellen!”
This interaction scenario is just an example of one of the many possible interactions that can occur with Vox. With this example we showed that the barrier for children to start new conversations and meet new friends is reduced. Maybe new friendships will be made!
How did we build a VoxBox?

The shell of the VoxBox is made out of 3mm thick white translucent perspex. To build 1 VoxBox,14 little pieces of perspex are needed: 2 hexagons, 4 big pentagons, and 8 small pentagons. These pieces are cutted out by a lasercutting machine. In the photo above an older prototype of a VoxBox has just been cutted at Protospace in the faculty Architecture.

Because the lasercutter can’t cut under an angle, the VoxBox would show gaps between the pieces. To avoid these gaps, the perspex pieces need to be grinded under an angle. To make further manufacturing inside the VoxBox possible, the shell is divided in 2 halves. The pieces are glued together with special glue. Tape is used to position the pieces while the glue hardens. In the photo above, we are putting together an older bottom half prototype of a VoxBox. Clearly, the edge of a piece doesn’t match the other piece: a gap is created. .


The VoxBox has 6 buttons to control the device. That means that the VoxBox has 6 microswitches inside, that are attached to the VoxBox. Because the children will push the buttons on the VoxBox, the buttons need to be well fixed and should not fall out of place. Therefore the buttons are supported by 3 layers of perspex with the microswitch inside them. The top layer that can be seen on the outer shell of the VoxBox is the button face surrounded by one of the VoxBox faces. Right beneath this perspex face is a perspex layer that holds the button in place. At last, a microswitch holder of perspex that prevents the button from pushed out of the VoxBox is glued on the button holding layer. Within the button holding layer the microswitch is positioned. With the current design the buttons are push and pull proof, are sunk in the shell, and give a nice click feeling and hearing.

On the photo above the bottom part of a VoxBox can be seen. The logo is engraved by a lasercutter.
A battery inside the VoxBox powers the circuits. So now and then, this battery needs to be charged. Therefore a power connector is positioned on the bottom hexagon of the VoxBox. This connector needs to be push and pull proof because plugging the plug in and pulling it out causes forces that may cause the connector to be pushed into the VoxBox. To protect the connector from being pushed into the VoxBox, a perspex supporting layer for the connector is glued on the inside of the VoxBox.
A connection is needed between the docking station and the VoxBox to upload and download sounds from the interaction point. The VoxBox should not fall out of the docking station while uploading and downloading. To make this connection, the VoxBox has 4 conducting magnets sunk in the bottom hexagon. The magnets are linked to a cable that goes to the microcontroller inside the VoxBox. The magnets function also as a temporary hold of the VoxBox in the docking station: children could dock their VoxBox in and leave it there without the need to hold it in their hands all the time.
On the photo, two bolts can be seen. These bolts hold the centerpiece on its position. The centerpiece inside the VoxBox fixes the two halves of the VoxBox together and supports all electronics (cables, micro controller, LED’s) in the VoxBox. With two sides this piece can be glued on the top half of the VoxBox, and can be screwed on the bottom half. This centerpiece should not be visible when the VoxBox is closed. Therefore, the centerpiece only touches the shell of the VoxBox on the edges where it’s glued on the inside.

On the photo above you can see what the inside of a VoxBox looks like. The red microcontroller is connected to the handmade circuit, within the middle the centerpiece. Also the speaker and microphone can be seen. All buttons and LEDs are connected to the ciruit as well.

How did we make the Vox?
The Vox is constructed out of 13 panels and 1 ground panel. Each panel is build up from the same layer structure. First, a layer of 6mm thick MDF is cutted and engraved with a lasercutter. A pattern with a cell structure with little holes in it remains. Then at least 3 LEDs are plugged and bent in each of the MDF cells, as can be seen in the picture above. The number of LEDs depends on the size of the cell.

On top of that layer, another laser cutted layer is placed with the same cell pattern. The two cell pattern layers hold the LEDs in their place, and create distance between the LEDs and the perspex. This distance is essential for an uniform distribution of the light through the perspex. The two cell pattern layers are placed on top of a solid 6mm MDF plate. This solid plate serves as the construction of the Vox and gives the Vox its firmness. Beneath every LED in this solid layer is a small hole to let the power cable of the LEDs through. To attach all three MDF layers together, little holes are lasercutted through all layers. These little holes can also be seen in the picture above. Screws fit in these holes and keep it all together. This way, all the pannels of the Vox can be disassembled.

The top layer, an acrylic plate, ensures a more uniform light distribution of the LEDs. Within our budget, we could choose between 3 different perspex materials. The acrylic plate that fits our design the best is shown in the photo above. This material lets 48% of all light through, the rest will be diffused in the material itself. Also, the cells of the cell pattern layer will just be visible enough.

On top of the three layers om MDF the perspex plate is glued with transparent glue. The next step is to give the 4 pins of each LED a cable that can conduct power. At least 800 LEDs are included in the Vox. There was a limited amound of this special LED cables, so ‘only’ 593 LEDs in total have a power cable. Piano hinges are used to attach the 13 panels to eacht other.

To control all 593 LEDs in the Vox, we soldered our own circuits. On the photo above, an almost finished circuit can be seen. The following components are soldered on each circuit: 2 TLC holders, 96 pinheaders, 3 resistors, 7 cables in, 7 cables out and a lot of connections between the pins and tlcs. With one ciruit, 8 cells can be controlled individually.

On the photo above you can see that the VOX is starting to get his shape! Almost all panels are connected to eachother with the piano hinges. Some of the panels already have their top layer of perspex glued on! On top of Vox is a circuit that is still has to be connected to some LEDs.

To dock the VoxBox in the VOX, a docking station is needed. These stations are made of the same perspex as the Vox. In this docking stations 4 metal pins are visible. On the bottom of the VoxBox 4 magnets are placed. When docking in, the magnets attract the pins. At this point the VoxBox is connected to the Vox. Through this connection. data can be transferred between the VOX and a VoxBox.


Design: collective effort
Software: Wendo Sabée | Thomas Valera
Materials: Teddy Damen
Electronics: Kian van der Enden | Jeroen ter Haar
Interaction: Denise van Bavel | Kiki Ottenhof
Fabrication: Jette Mul
Project leader: Felix Quaedvlieg
We want to thank our instructors for supporting us during the minor:
Aadjan van der Helm
Chris Kievid
Dieter Vandoren
Walter Aprile
We want to thank all our sponsors for helping us completing the Vox:
Van Dorp Hout: MDF plates
Nancy Klomp Watersnijtechniek: Lasercutting the MDF plates
WSV Kunststoffen BV: perspex plates
SnijLab: Lasercutting the perspex plates
Floris.cc: SD-cards and readers
Peute recycling: computer
RedHound: rechargeable batteries inside the VoxBox
Magneetspecialist: magnets in the VoxBox
Powered by Hyperbody and ID StudioLab
In asscociation with Prinses Máxima – Centrum voor Kinderoncologie